Getting started
Welcome to GeoBiologics, your premier destination for biological discovery. This guide is your roadmap to mastering our platform and setting you off on your antibody discovery journey.
We will guide you step-by-step through the basics of this platform. You will learn how to create an account, start a project, submit a job, and view the results. Let's get started on this path of exploration and innovation!
Apply for a trial
Applying for a trial of GeoBiologics is a simple process. Just follow the instructions and you should be done in a few minutes. Here's a guidance of the process (feel free to skip it if you already have an account):
| Instruction | Interface | |
|---|---|---|
| 1 | Enter the application interface You can enter the GeoBiologics homepage and press the "Apply for a trial" button to start the application. Note: If you are already a registered user, you can sign in by clicking on the "Login" button on the top-right of the page. |
  |
| 2 | Fill in the required information You will be asked to fill in some personal information, including your name, institution, position, email and phone numer. Don't worry, we'll keep your information secure. Please also kindly tell us about your needs and expectations so that we can better serve you. Note: We'll contact you within three working days of receiving your application. |
 |
Start your first project
Once you sign in GeoBiologics, you will be redirected to the project page of the dashboard.
You can press the button and enter a project name to start a new project.

Submit your first job
When you have created your first project, click on the project card to enter the Project Editor.
The Project Editor page is the main interface of GeoBiologics. It contains a sidebar on the left where you can list available jobs and view current files and jobs, and a main panel on the right where you can open various tabs toinspect protein structures, fill in the job submission form, and view the job results.

Now you are ready to submit your first job! Click on "Protein Structure Prediction" in New Job to open the Job Submission Form.
Once you've opened the job submission form, enter a sequence (e.g. the PETase sequence below) in the input box and press "", and voila, you have just submitted your first job!
MGSSHHHHHHSSGLVPRGSHMRGPNPTAASLEASAGPFTVRSFTVSRPSGYGAGTVYYPTNAGGTVGAI
AIVPGYTARQSSIKWWGPRLASHGFVVITIDTNSTLDQPSSRSSQQMAALRQVASLNGTSSSPIYGKVD
TARMGVMGWSMGGGGSLISAANNPSLKAAAPQAPWDSSTNFSSVTVPTLIFACENDSIAPVNSSALPIY
DSMSRNAKQFLEINGGSHSCANSGNSNQALIGKKGVAWMKRFMDNDTRYSTFACENPNSTRVSDFRTAN
CSLEDPAANKARKEAELAAATAEQ
Uploading sequences from your local machine
Besides entering the input sequences in the input box, you could also upload a FASTA file containing the input sequences from your local machine. To do that, press the "" button on the top-right of the job submission form, and select the FASTA file you want to upload. The file will be automatically parsed and displayed in the form.
Tips: You could also directly paste a valid FASTA string into the input box.
View job results
After a job is successfully created, a new job entry will be added in Files & Jobs component.
The entry will have a spin icon (![]() ) until the job is finished (succeeded or failed).
) until the job is finished (succeeded or failed).
Click on the job entry to view its status and results. You will see a Job Result Panel, shown below, which holds the job info, input, parameters, and a summary table where each row corresponds to an input sequence.

Inspect the predicted structures
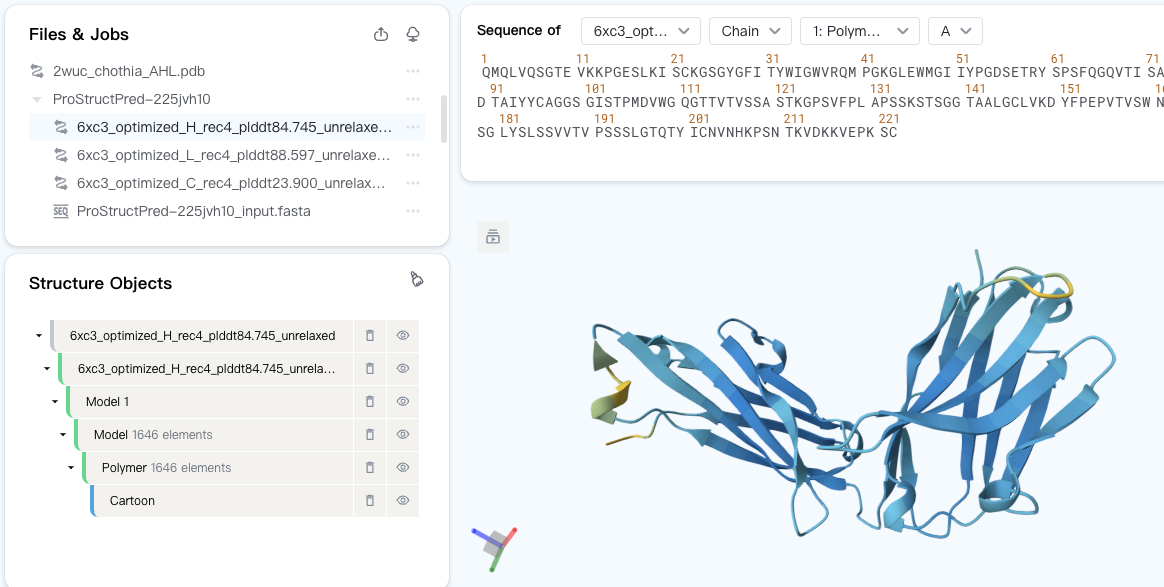
If you want to inspect the predicted structures in GeoBiologics's Mol* Viewer, click on the files under the job entry. They are the outputs of the structure prediction job.

By default, the predicted structure is colored by the predicted lDDT (local Distance Difference Test) score using the AlphaFold2 color scheme. The higher the plDDT score, the more confident the model is in its prediction.
How confident should I be in a prediction?
Adapted from EMBL-EBI AlphaFold Database FAQ. Note that proprietary structure prediction models trained by BioGeometry are also applicable to the following guidelines.
- plDDT > 90: Very high confidence in the prediction.
- 70 < plDDT < 90: High confidence in the prediction.
- 50 < plDDT < 70: Medium confidence in the prediction.
- plDDT < 50: Low confidence in the prediction. For well-studied proteins, this is a reasonably strong predictor of disorder.
- Structured domains with many inter-residue contacts are likely to be more reliable than extended linkers or isolated long helices.
- Unphysical bond lengths and clashes do not usually appear in confident regions. Any part of a structure with several of these should be disregarded.
Mouse controls of the Mol* Viewer
Adapted from Mol* Viewer's documentation.
- Rotate: click the left mouse button and move. Alternatively, use the Shift button + left mouse button and drag to rotate the canvas.
- Translate: click the right mouse button and move. Alternatively, use the Control button + the left mouse button and move. On a touchscreen device, use a two-finger drag.
- Zoom: use the mouse wheel. On a touchpad, use a two-finger drag. On a touchscreen device, pinch two fingers.
- Center and zoom: use the right mouse button to click onto the part of the structure you wish to focus on.
- Clip: use the Shift button + the mouse wheel to change the clipping planes. On a touchpad, use the Shift button + a two-finger drag.
- Highlight: hovering over any part of the 3D structure displayed in the Structure Viewer, without clicking on it, will highlight it (by coloring it in magenta) according to the current Picking Level. Additionally, in the bottom right of the Structure Viewer, information about the PDB ID, model number, instance, chain ID, residue number, and chain name is listed for the highlighted part of the structure.
- Focus: In default mode, click on a 3D object to focus on it. The focused object and its surroundings will be displayed in a ball & stick representation. All local non-covalent interactions will be shown. To hide the surroundings, click on the target residue again. To un-focus, click on any point in the background of the Structure Viewer.
To close the file, press the "" button in the "Objects" component.

Next steps
Congratulations! You have successfully submitted your first job and viewed the results in GeoBiologics's Mol* Viewer. Now you are ready to explore the full potential of GeoBiologics. Here are some suggestions:
- Antibody Screening and Optimization: Comprehensively evaluate and optimize your lead antibodies with powerful and specialized AI assistants.
- User Interface: Discover the smooth user interface of GeoBiologics.
- Job Tutorials: Learn to harness the full potential of our models.