De Novo Antibody Design
De Novo Antibody Design is a task to design an antibody bound to a given antigen/epitope de novo. It is especially valuable for antibody discovery against "hard-to-drug" antigens.
Challenges
The search space for de novo antibody design is huge as we need to determine the amino acid types and positions of 30+ residues in the paratope while considering antibody stability and developability. Traditional methods struggle to balance efficiency, novelty, and accuracy, while BioGeometry's generative AI methods like GeoFlow have achieved a state-of-the-art 18.7% average hit rate in de novo antibody design.
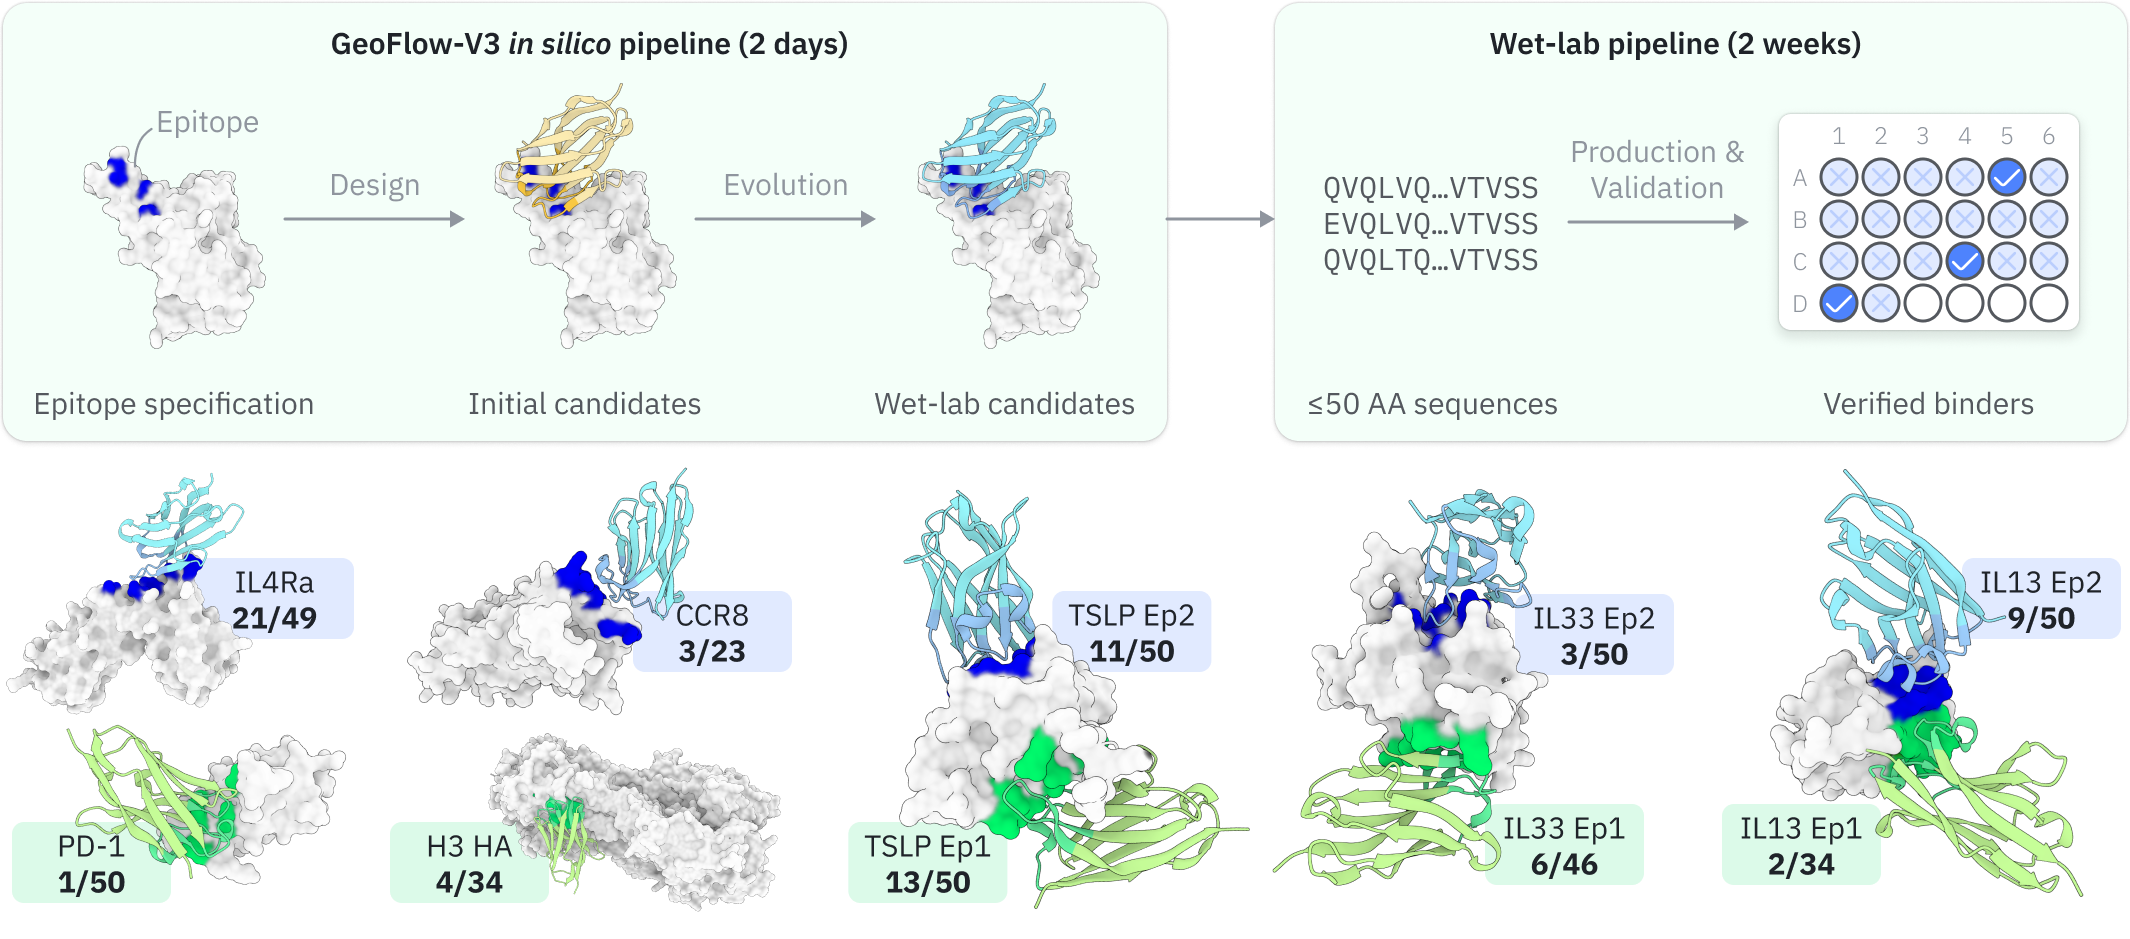
Pipeline overview
Here we provide a high-level overview of the GeoFlow-V3 de novo antibody design pipeline to help you achieve better design outcomes.
- De novo design: GeoFlow takes the antigen and partial antibody sequence as input to design initial sequences and structures of the antibody given the specified target epitope.
- Virtual screening: GeoFlow takes the full Ag:Ab sequence as input and outputs confidence metrics and the predicted structure, which are then used to calculate the self-consistency metrics and antibody developability metrics. These metrics are used to screen the top candidates for further optimization.
-
In silico evolution: If "evolution" is enabled, GeoFlow will perform multiple rounds of in silico evolution on the top candidates to further improve the bind rate of the top candidates. Each round of evolution consists of partial redesign of a selected antibody region and top-candidate selection. The final results are the top candidates from the last round of evolution.

Illustration of the in silico antibody evolution process.
Inputs
To submit a De Novo Antibody Design job, open the Project Editor and click "New Job" button on the left sidebar. Then click "De Novo Antibody Design" under the "Antibody Design" group to open the job submission page.
-
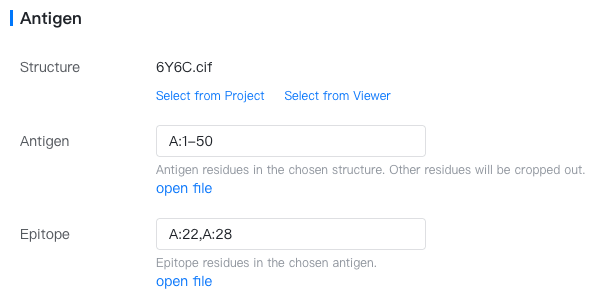
Antigen: The target antigen.
-
Structure: Choose any PDB or mmCIF file containing the desired antigen structure. If the file is already open in the structure viewer, click "Select from viewer". If the file is in your current project, click "Select from project". Otherwise, you can upload it in the Files & Jobs or import it from cloud databases like PDB.
-
Antigen: Specify the antigen residues, e.g.,
A:3-27,B:10-50. Please note that relative positions between the multiple antigen chains will be kept. -
Epitope: A set of residues comprising the epitope (antibody-binding sites) of the antigen. Input a comma-separated list of contiguous sequence fragments with the format
{chain}:{start_res}-{end_res}, e.g.,A:2-10,A:15-30,B:40-100. You could also select the epitope from the antigen structure using the Structure Viewer and click on "import from selection" to fill in this input box automatically.
Epitope format
In GeoBiologics, the epitope residue list comprises one or more "sites" and "fragments".
- Each site is represented as
{chain_id}:{res_id}, e.g.,H:100. - Each fragment is represented as
{chain_id}:{start_res_id}-{end_res_id}. For example,H:100-112. Note that the start and end residue IDs are label residue IDs rather than author residue IDs.
Multiple sites or fragments can be joined by commas, e.g.,
H:100-110,H:111,H:111A,H:112B,L:50-60,L:92.Import antigen/epitope from selection
Click the "Antigen" or "Epitope" input box and you will see "open file" or "import from selection" below the input box.
- If the input structure file is not opened in the Structure Viewer, you can click "open file" to open it.
- If the input structure file is already open in the Structure Viewer, you can enter Selection Mode and select mutation sites on the structure. Then click "import from selection" to automatically fill this input box.
- You can also run the Interface Visualization job, which will create interface" components in the Structure Viewer. You can then select the antigen's interface to the antibody and click "import from selection" to automatically fill this input box.
-
-
Antibody: An antibody with CDR regions to be designed.
- Sequence type: VH+VL (IgG) or VH (nanobody).
- Antibody Name: Name of the antibody. Defaults to "Antibody 1". To change it, hover above the antibody name, and click on the "
 " button.
 - Sequence: Sequence of the antibody template, specified per region (FR1, CDR1, ..., FR4). Specify CDR residues to design as "X". To design a variable-length region, input "[X, {min_length}-{max_length}]", e.g. [X, 12-18]. FR residues can not be designed.
Example CDR templates
[X, 12-12]: Design whole region (12 resides).[X, 10-18]: Design whole region (10-18 residues).AR[X,3-6]A[X,3-3]: Partial redesign. Fix 3 residues, design 3-6 residues in the first fragment and 3 residues in the second fragment.AR[X,3-5]CDXXTX: Partial redesign. Fix 5 residues, design 3-5 residues in the first fragment (afterAR), 2 residues in the second fragment (afterCD), and 1 residues in the third fragment (afterT).
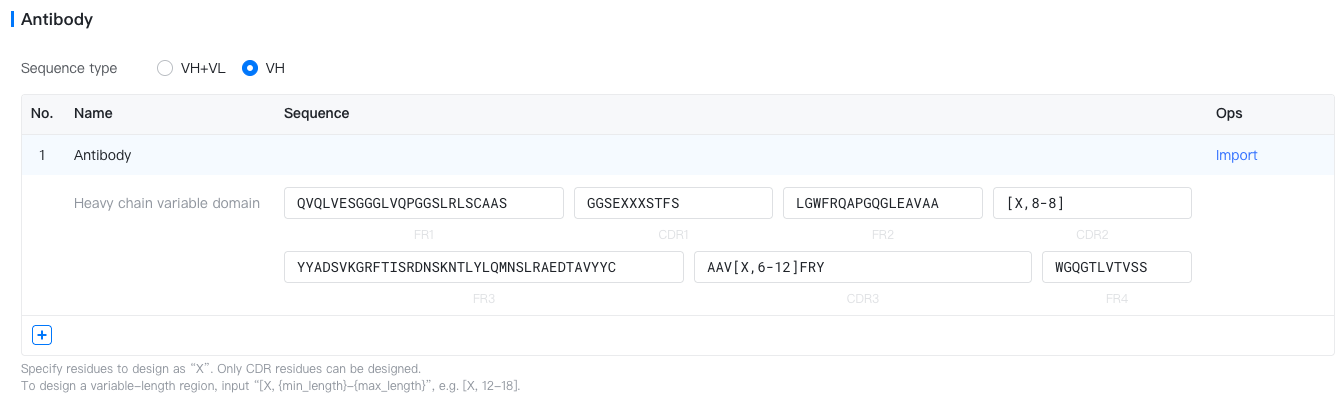
- Import: Click the "Import" text to fill in the antibody sequence template from a validated antibody (e.g. Trastuzumab) or any custom antibody.

-
Job Name: Name of the job. Note that the job name must be unique within the project.
Models & Parameters
GeoFlowV3, our proprietary generative model for antibody design, is available for this job. Parameters of this model are as follows.
- # Structure: The number of structures to generate (default to 10000). If your input contains multiple antibody templates, each generated structure will randomly select one antibody template to use.
- # Seq/Struct: The number of sequences to generate per valid structure (default to 40).
- Experiment budget: The number of designs returned in the Representative Structures table (default to 40). If you plan to perform manual structure inspection on the design results, specify a number 1-2 times larger than your actual experiment budget.
Tips for parameter selection
In real-world projects, you are recommended to try a ~1000 structure × 4 seqs/struct run first to validate the epitope, and then adjust the parameters according to the virtual screening pass rates in the first run. If the pass rate is low, try to increase the number of designed structures & sequences to get enough high-ranked candidates.
Results
Click the job name in the Files & Jobs panel to view the job results.
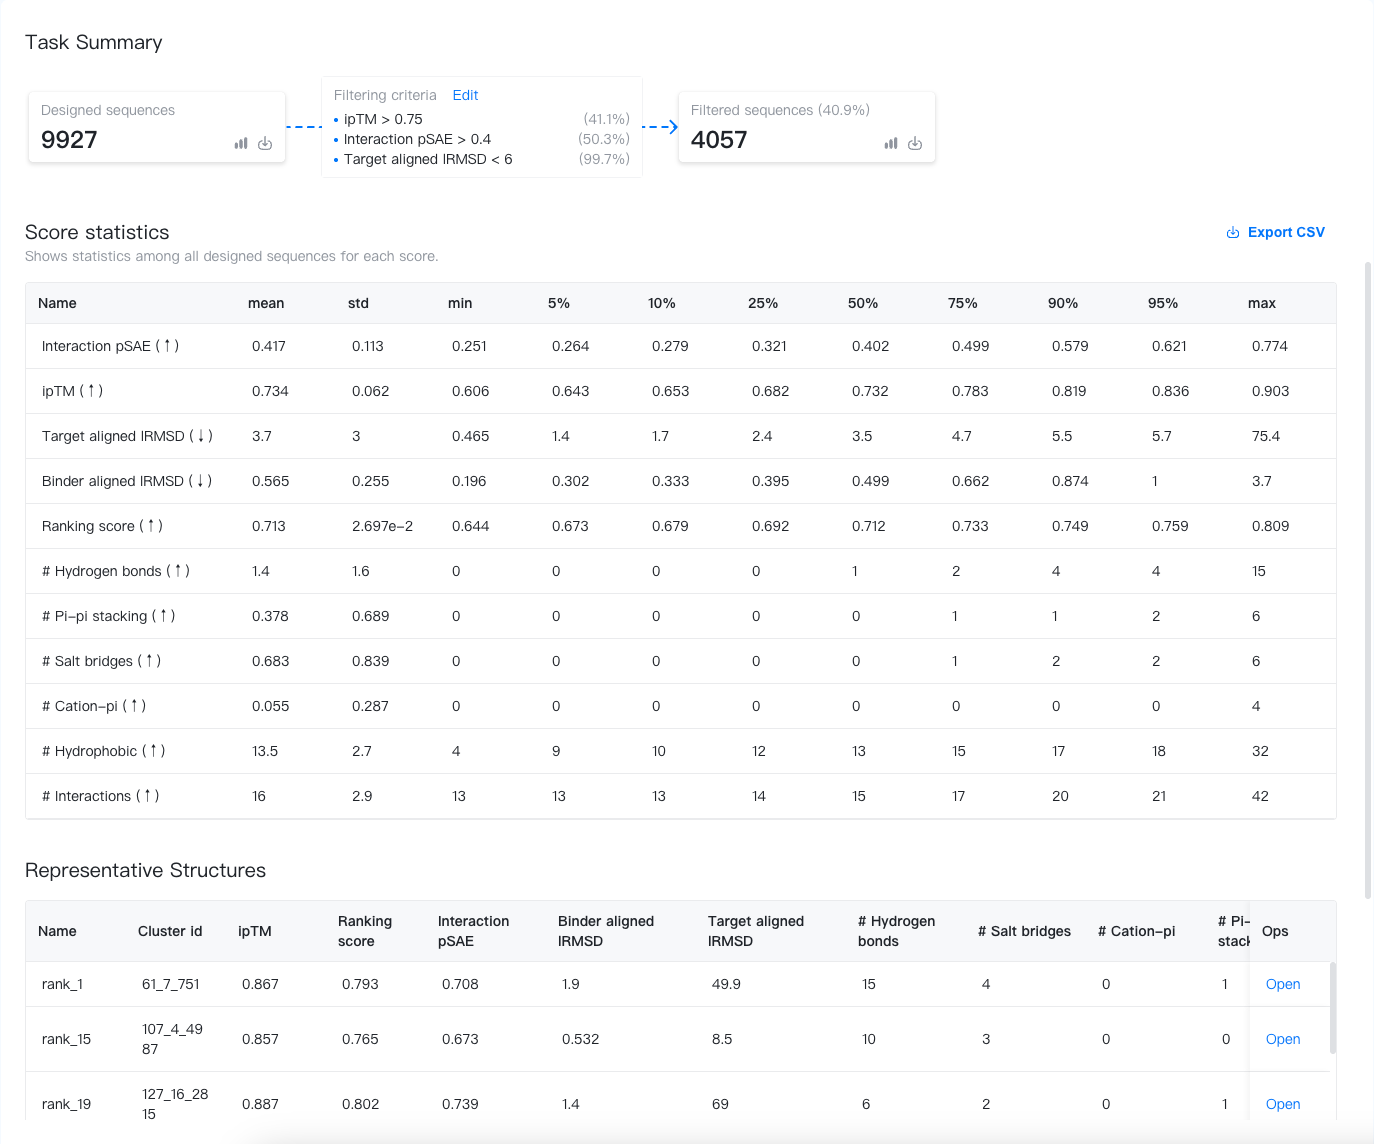
Task Summary
The task summary displays key information about the designed sequences, the filtering criteria, and the filtered sequences. Let's break it down here:
- Designed sequences: The bold number shows the total number of designed sequences.
 : Click to preview the first 500 designed sequences and their scores.
 : Hover to download (1) sequences of the designed region(s) and all corresponding scores in a .csv file; (2) the full designed sequences in a .FASTA file; and (3) all the designed sequences in a .tar.gz file.
- Filtered sequences: The bold number shows the total number of filtered sequences. The percentage is the ratio of designed sequences passing the virtual screening filter.
- : Click to preview the first 500 filtered sequences and their scores.
- : Click to download (1) filtered sequences of the designed region(s) and all corresponding scores in a .csv file; (2) the full filtered sequences in a .FASTA file.
- Filtering criteria: The filtering criteria used in the virtual screening. Each criterion is accompanied by a percentage to the right, indicating the ratio of sequences passing the criterion. You can customize the filtering criteria by clicking on "Edit". The filtered sequences will be updated accordingly.
Scores computed during virtual screening
The virtual screening process is based on our proprietary GeoFlow model, which checks the consistency between the designed sequence and structures by calculating the following scores:
- ipTM: The predicted interface TM (Template modeling) score for the Ab:Ag complex. Higher score indicates higher confidence in the interface regions.
- Ranking score: The score used in AlphaFold3 ranking. It is basically a predicted weighted TM-score calculated by \(\mathrm{wpTM} = 0.8 \times \mathrm{ipTM} + 0.2 \times \mathrm{pTM}\), plus some penalty terms for disordered regions and clashes.
- Interaction pSAE: The prediction Score from Aligned Error averaged over the antibody-antigen residue pairs. Higher score indicates higher confidence in the predicted antibody-antigen interaction.
- Target-aligned lRMSD: The antibody's root-mean-square deviation (RMSD) after aligning the targets (antigens) in the predicted and designed structure. A score within 6Å indicates good epitope consistency. This score can be high if the predicted epitope (antibody-binding sites) is far from the designed structure.
- Binder-aligned lRMSD: The antibody's root-mean-square deviation (RMSD) when aligning the predicted antibody structure to the designed structure. A score within 3Å indicates good antibody structure consistency. This score is usually low.
- # Hydrogen bonds: The number of hydrogen bonds between the antibody and the antigen.
- # Pi-pi stacking: The number of π-π stacking interactions between the antibody and the antigen.
- # Salt bridges: The number of salt bridges between the antibody and the antigen.
- # Cation-pi: The number of cation-π interactions between the antibody and the antigen.
- # Hydrophobic: The number of hydrophobic interactions between the antibody and the antigen.
- # Interactions: The total number of non-covalent interactions (sum of the above interactions) between the antibody and the antigen.
Score statistics
This section shows the score statistics of all designed sequences. The statistics shown include the mean, standard deviation, minimum, and maximum scores, and the 5%, 10%, 25%, 50%, 75%, 90% and 95% percentiles. You may use these statistics to understand the distribution of the scores and to set the filtering criteria.
Representative structures
Since returning all structures will make your project a mess, we only display the top-k (k = Experiment budget) structures and their corresponding scores. You may click "open" to open the structures in the Structure Viewer.